 You know those days when you somehow wander down the time warp black hole that is Youtube... and instead of watching kitten videos you find yourself watching video after video of a crazy cake maker and her themed fondant cakes... No? Ok, maybe I'm alone on this one. But it's a true story nonetheless... After seeing fondant cake after fondant cake I felt hooked on the idea of making a fun themed cake... only I really REALLY don't like fondant :S But when I saw an emoji cake I thought "Aw, how can I NOT make an emoji cake now?!" ... and so, all inspired (and perhaps a little overstimulated by some special chocolate) I headed into the kitchen and made spontaneous emoji cakes -- sans fondant, and infused with stuff I can actually eat!

So... this post isn't so much a cake recipe, because the truth is there are many ways to enjoy an emoji cake... You can make the cake base whatever cake / flavor you like (I'll give options further down). And there are options for different diet-friendly frostings, too... But I thought I'd share my process in case, you know, you're also a little emoji obsessed and can appreciate the humor of whipping one of these cakes out to surprise someone... ?

I started off by making the frosting first, because the frosting I used needs time to set -- hours. I didn't go with fondant because a) I've never been a fan, and b) It's nearly impossible to make a workable fondant without a boatload of ingredients I can't have, and c) Commercial fondant is filled with a lot of things that scare me. I know it's ok for an occasional treat, but what's wrong with a more approachable and wholesome frosting instead, you know?
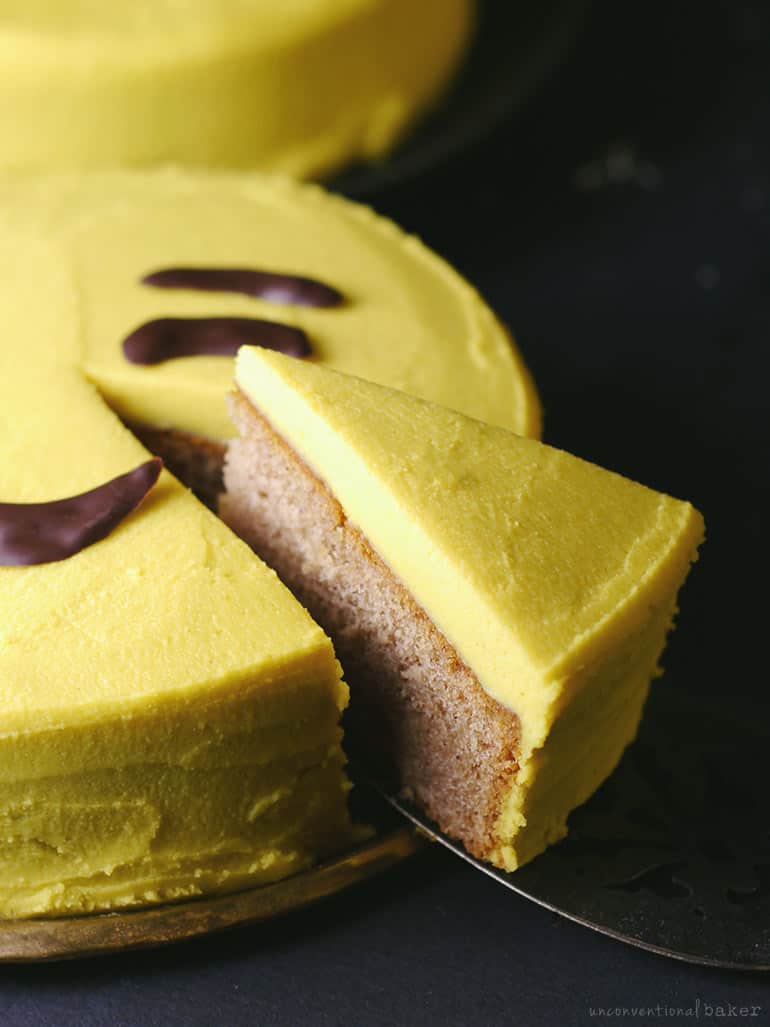
I used the frosting from this classic cashew vanilla birthday cake, but added 1 teaspoon turmeric. Worked a treat for a gorgeous natural yellow. And the other flavors in the frosting overpower the taste of the turmeric, in case you're not a fan... So I made it and popped it into the freezer. Then baked my cakes (I made 2 six inch ones), let them cool, and then frosted when the frosting was chilled and firm enough to work with.

Blank canvas ready. You could in theory now paint any emoji you like straight on the cake... but I have to fess up -- I'm a huge wimp and get a paralyzing fear of screwing up a cake when it comes to writing on cakes. Just one clumsy error and the whole thing ends up mucky... so I opted for an easy fix -- make the chocolate "features" separately.
I went with chocolate for obvious reasons: easy, wholesome, delicious, non-fussy. If you choose an emoji that's complicated (i.e. multi-colored) you'll need to be ready to introduce other ingredients into the mix -- possibly food colors (or natural berry or veg powders, some coconut oil, a sweetener). I just wanted to keep things simple -- plenty of emoji that I love and that do well with just simple chocolate. Like ????... You get the idea. But you've also got plenty of room to improvise and make others, too.
So what I did was trace the shape of an emoji I liked on parchment paper. I don't have a printer so I actually traced right off the screen. Googled an emoji I liked, blew it up by zooming in plenty, and went on to drawing away the outline only (no need to fill in of course)...

You could also just draw if you prefer.. I'm just not that gifted in that area ;) Plus, tracing was super fast. Then I flipped the parchment paper over (very important) and taped it facing down onto a flat tray. Facing down because once you trace over the paper and collect the chocolate results, they'll absorb the marker lines as well -- which you obviously don't want. So flip it over -- you'll still see the outline, but your chocolate will now be safe from any sharpie fluid...

(See, I told you I wasn't very gifted at drawing ?). Ok, so once the parchment is taped (this is important so it stays super flat), pop it into the freezer for about 10 minutes while you melt your chocolate. A chilled tray will help the chocolate set quickly, minimizing the chance of it oozing out of your desired shape.

Melt your chocolate and fill in the "features" with it carefully, first by doing an outline of the shape (important) and then fill it in on the inside. I used my little pen tool (pictured above -- love that thing), but you can use a pipping bag with a narrow fitting or a squirt bottle, etc.
I felt like the separate chocolate "features" give you a lot more control and a bit more texture. And minimize screw-ups... Otherwise, my wink emoji cake could have had a mole! ?

Once you're done piping those features out, pop the pan into the freezer for another 10 minutes or so until the chocolate fully hardens. Then carefully peel them off the parchment paper and place on your cake. DONE! Oh, just keep the cake chilled if it's warm where you are -- wouldn't want that chocolate to get all melty on you after all that effort ;)

Ok, now to cake options. I'll post at the end exactly what I used to make the cakes pictured. However, as I mentioned earlier, you could really use any cake you like here as a base. So here are some options for a cake base:
BAKED CAKE:
RAW / NO-BAKE CAKE:
Now to the frosting... some options:
FROSTINGS:
CHOCOLATE:

Did I cover everything? I sure hope so ? That was a long one, wasn't it...?

Sorry, I couldn't resist ?
P.S. Note: the recipe below is for a single 6" cake. Double for a 9". I just thought the smaller cake size was more easily workable.
PrintEmoji Cake

A fun emoji cake tutorial for turning your favorite gluten-free vegan cake into a smiling emoji using whole food ingredients for coloring.
- Prep Time: 60 minutes
- Cook Time: 40 minutes
- Total Time: 1 hour 40 minutes
- Yield: 6" cake (double for 9")
- Category: Cake
- Method: Baked
- Cuisine: Dessert
Ingredients
Frosting:
- 6 oz / 120 gr firm tofu
- ¼ cup coconut butter, softened
- ½ cup agave or maple syrup
- 2 tbsp lemon juice
- 1 tsp pure vanilla extract
- ½ tsp almond extract (or orange blossom water)
- ¼ tsp salt
- 1 cup shredded unsweetened coconut
Liquid Cake:
- 2 tbsp almond milk (or another plant milk)
- ½ tbsp apple cider vinegar
- ½ cup maple syrup (or agave, coconut nectar, etc.)
- 1 tsp pure vanilla extract
- ¼ tsp pure almond extract (or orange blossom water)
Dry Cake:
- 6 tbsp white rice flour
- ¼ cup tapioca starch
- 3 tbsp sweet sticky rice flour/glutinous rice flour
- ¼ tsp guar gum
- ¼ tsp baking powder
- ⅛ tsp baking soda
- dash of salt
"Butter" Mixture:
- ¼ cup cashew butter
- ¼ cup boiling water
Chocolate "Features":
- approx ½ cup melting chocolate (more or less depending on how complex your emoji is and how big you make it)
- parchment paper
Instructions
- Prepare the frosting by combining all the ingredients in a power blender until completely smooth (use the vitamix tamper to help you along, or pause to scrape sides and keep blending until the coconut is incorporated). Transfer into a glass container and freeze until cake is ready to be frosted (or for at least 4-5 hours to let it firm up).
- Pre-heat the oven to 350F. Oil a 6" cake pan. Set aside.
- In a small bowl combine the plant milk with vinegar and set aside, allowing it to curdle a little while working on next step.
- Combine all dry ingredients in a large mixing bow. Add in all liquid cake ingredients, including the almond vinegar mixture, and mix everything thoroughly to combine.
- In a separate bowl combine the cashew butter with the boiled water and stir to thin out and dissolve the cashew butter. Add this to the cake batter and mix everything to combine. Pour the batter into prepared cake pan.
- Bake in a preheated oven for approximately 40 mins (until the top is lightly golden and a skewer inserted in the center of the cake comes out dry). Remove from oven and cool on a cooling rack completely before proceeding to frost.
- Once cake and frosting are cooled enough, frost cake, and place in the fridge. Prepare the chocolate "features" as per instructions in the post above). Decorate cake and enjoy! Keep it chilled or refrigerated.

Sakshi Vejani says
This is great!!!!! Anything I can substitute for the glutinous rice flour? Don't have any available atm..
Audrey says
Hi Sakshi, you can use more rice flour or a gluten-free generic flour mix, or some other gf flour. However note that the cake will be more perceptibly "gluten-free" tasting without the glutinous rice flour -- it's what gives the cake great bounce and texture.
Cammie says
I wish I could post a picture of my huge fail at this. Putting the parchment paper in the freezer made it bumpy, then the features ran uncontrollably. It was hilarious, just like the emoji I tried to replicate???
Audrey says
Oh no ??
Were you able to remake the emoji part separately afterwards?
Rosie says
You are too cute Audrey... Next you will have to master the little monkey emoji! :)
Audrey says
Haha. That would be a toughie.. but hm... now I'm interested to try it! ?
Tina says
Oh Audrey, they are just too cute. I showed the little one and she giggled and giggled and would like me to make one. The little one wanted to also say ":) thank you for doing them as I laughed so much ??"
Audrey says
Aw, well that's just what I was hoping for -- good giggles ?
Rebecca Strength and Sunshine says
Bahahaha! I love it! So beyond cute! You should go on Cake wars on Food Network ;)
Audrey says
Lol. Not quite there yet, but thanks :D
Natalie | Feasting on Fruit says
That is one cool cake! ? I'm very amazed by the vibrance of his yellow face too with just one tsp of turmeric. I have actually fallen down similar YT holes (I'm not even going to tell you how many My Cupcake Addiction videos I've watched lol) and I always get super motivated to make epic cakes but then I remember it's really hard and I just end up with cupcakes and not even piped frosting :D That pen is really cool, and you are actually quite a good chocolate artist compared to my past attempts! And the inside cake texture looks incredible <3 Plus these snazzy little menu things :o So cool! Almost as cool as the cake, but they don't have sunglasses so not quite :)
Audrey says
My Cupcake Addiction videos?! What are those? :) And yes, I love the snazzy menu things -- just a shortcode in the new theme, but makes things a lot neater.
Natalie | Feasting on Fruit says
It's this lady who makes epic themed cakes. I'm sure she has a minion or two :D
Audrey says
Going to have to look up now :)