When it comes to comforting traditional desserts, a crepe cake somehow isn't typically the first thing that comes to mind, and yet it totally should be! Because who can resist endless layers of delicious crepes and complementary fillings like whipped cream and raspberry jam? Not me, and I bet you won't be able to either ;)

Crepe cakes are one of those desserts that I don't get to make often, but when I do, they always end up being a cause for excitement. I usually fill mine with layers of homemade hazelnut spread, fresh fruit, or jam, but in this case I felt like something light so went with layers of raspberry and coconut-whipped cream and it turned out just lovely. A new favorite!
Somehow the light color and creaminess of the whip made the raspberry jam layer pop out in the most appetizing of ways here:

I also added a layer of crepe crumble into the mix (you'll see what I mean when you get to the recipe section) partly to re-use crepe trimmings, partly to add another lovely texture layer to this cake for variety, and partly because as I was making it I kept having one of those Russian layered honey cakes (Medovnik) pop into my mind -- something I haven't had in ages and a subject I think I'll have to revisit on the blog one day ;)
And while on the subject of filling, there's definitely room for versatility. You can use a jam flavor of your choice (I linked to a few recipe ideas from the blog in the recipe notes as well, if you're a DIY kind of person). If you're sensitive to coconut, you can use the aforementioned "nutella" spread instead of the whip, or your favorite nut butter mixed in with maple syrup or coconut sugar (to thicken and sweeten it) and a pinch of salt.

For the crepes here I used this basic crepe recipe from the blog, which you can see in the video below:
If you're into raw / grain-free stuff, you can make some raw crepes, a chia jam, and stick with the coconut whip, and it's a done deal.
For the top of the cake, I went with a simple dusting of coconut milk powder, but you can also top the cake with more whipped cream and fresh fruit for instance, or some drizzled chocolate with fruit. The final cake seemed quite tall and "impressive" (maybe even "imposing" -- it's so tall!) to me as it is (as you can see in the quick video snippet below), which is why I went with the simpler coconut milk dusting route (plus the powdery "snowy" look always makes me happy ;)
The number of layers, and how you alternate them is also of course flexible. Crepe cake "pro" tip ;) -- I found the 6" cake size to be a nice one for this, as you still get a lot of cake with each slice due to the height, and smaller crepes are much easier to work with.

All in all it turned out to be a lovely treat and a new favorite around here. It's a great celebration cake for when you're feeling like something a little different, or for when you need cake and don't have an oven... that happens ;). Plus, when you've got leftovers you get dessert for breakfast :p
And speaking of "celebration cake," the day I was working on this cake I received a copy of the latest Thrive Magazine issue (the largest plant-based publication in the US) featuring a 2 page spread about Unconventional Baker -- good thing I had just the cake in the works to mark the occasion :)

Raspberry Whip Crepe Cake
A gluten-free vegan crepe cake, filled with delicious layers of coconut whip and raspberry jam. This eggless crepe cake is also refined sugar-free, and can be made nut-free.
- Prep Time: 1 hour
- Total Time: 1 hour
- Yield: 6" tall layer cake
- Category: Cake
- Cuisine: Dessert
Ingredients
Crepes:
- 3 batches of this gluten-free vegan crepes recipe*
Crumble Layer:
- Leftover scraps from crepes (see step 2)
- ¼ cup coconut cream**
- 2 tbsp maple syrup
- 1 tsp pure vanilla extract
- ⅛ tsp salt
Coconut Whip Filling:
- 3 cups coconut cream (only the solid white part -- see notes)**
- 5 tbsp maple syrup
- 1 tsp pure vanilla extract
- ⅛ tsp salt
Raspberry Layer:
- about ½ cup fruit-sweetened raspberry jam***
Topping:
- 1 tbsp coconut milk powder for dusting****
Instructions
1. Prepare the crepes ahead of time and allow them to cool off completely. Ideally prepare them the day before, cool off to room temperature, then cover and refrigerate overnight. Alternatively can be made same day, provided they have enough time to cool, and then chill slightly before assembling the cake (this will help the coconut whip to set better). Also, note that when making the crepes, try to make them bigger than your desired cake diameter (see next step).
2. Once the crepes are ready to be used for the cake, place each crepe (one by one) on a cutting board, cover with a plate or bowl that is of your desired cake diameter (I used one with a 6" diameter) and cut around the edges (this step ensures that the cake layers are even so that the cake doesn't get "droopy" around the edges). Here's what the edge trimming should look like:

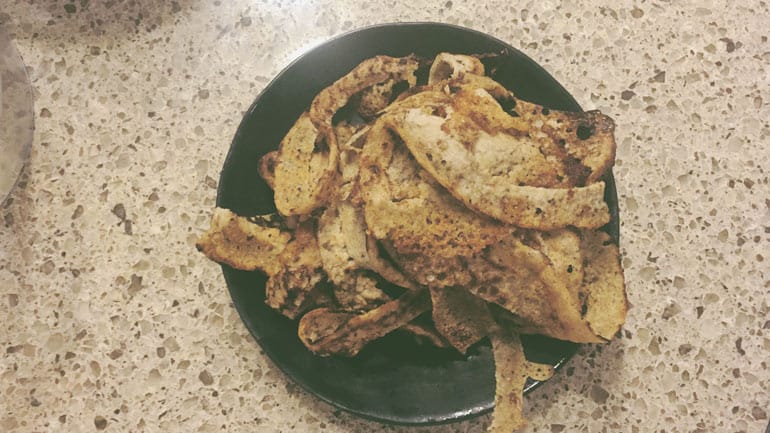
Place the cut-away scraps in a small food processor (I used the small bowl attachment of my processor) and set aside. For clarity, this is what my trimmings looked like before going into the processor:

Stack all the newly-trimmed crepes on a plate, and use this opportunity to pick the "prettiest" crepe for the top of the cake (set it aside for now).
3. Once done trimming the crepe edges and adding them to the food processor, add in remaining "crumble layer" ingredients and process on pulse to create a soft "crumble." Set this mixture aside for now.
4. Make coconut whip by placing all the solid coconut cream into a large mixing bowl and mix lightly with a hand mixer to whip it up. Add in all remaining coconut whip filling ingredients and mix lightly again to incorporate. Note: you don't want to over-mix this mixture. When done, it should look like this:

5. To assemble the cake, place a crepe in the center of a serving plate (if you have a cake turntable, it's super helpful for a recipe like this). Scoop out about 2-3 tablespoon whipped cream onto the crepe and use a small cake spatula to spread it around, getting as close to the edges as possible. The thickness of the layer should look approximately like this when done:

Top with another crepe. Repeat with another coconut whip layer. Top with another crepe. Tip before you move on: don't press too hard on the layers as you're spreading the whip, so that the filling doesn't start getting pushed out the sides on the layers below. Next spoon about 1½ - 2 tablespoon raspberry jam (I used 2 regular kitchen teaspoonfuls) onto the center of the crepe and spread it around with the back of the spoon into a thin layer. Note that you don't want to use too much jam here as otherwise it will ooze down the sides of the cake. Here's what my jam layers looked like:

Top with another crepe and repeat with another layer of coconut cream and another crepe. Repeat this step again. Then spread half of the crumble mixture -- I actually found it easiest to use my hands here to break the mixture up and flatten it neatly. It should look like this:

Cover with another crepe. Add a layer of coconut whip topped with a crepe, then a layer of raspberry jam topped with a crepe, then another layer of the remaining crumble. Repeat with another layer of whip topped with a crepe, and then a layer of raspberry topped with a crepe. Then do two more layers of the coconut whip topped with a crepe, another raspberry layer, and a few more coconut layers until you run out of crepes. Finally top with the crepe you set aside for the topping (in step 2).
6. Dust the cake with some dried coconut milk powder (using a small sieve) and serve. For best texture, enjoy this cake same day and serve at room temperature or very slightly chilled.*****
Notes
*I actually made 4 batches of these crepes, and picked the best ones for the cake (the cake itself only requires 3 batches). I blended a double batch of the crepe batter (twice in total) and added ½ a cup extra plant milk to each double batch to thin the batter out a little (see notes on crepes recipe and tips in that post for more details). I used the oat crepes version for this cake with the suggested maple syrup and salt extras suggested in the recipe, but feel free to use one of the other suggested flour options if you prefer.
**The coconut cream used in this recipe is only the firm white stuff gathered at the top of chilled cans of full-fat coconut milk. You’ll need to chill the cans in an upright position overnight for the cream to separate from the water and surface up to the top. I used the Thai Kitchen full fat coconut milk cans for this recipe and I find that the large 400ml cans yield about ¾ cups cream each once chilled and separated, and the tiny cans (160ml) yield about ⅓ cup cream each (I prefer working with the smaller cans as they seem to separate better). Reserve the remaining water for other uses, only use the firm white cream for the whip. Note that it's very important for the full fat coconut milk cans to be chilled first so it separates. If the solids aren't this thick when you open the can, the whip isn't going to work as well and will be too liquid:

***For the jam here you can use a store-bought jam of your choice. I like St. Dalfour’s fruit-sweetened jams in terms of store-bought options. Alternatively, can make a quick and easy homemade version of a refined sugar-free jam using one of the following recipes: raspberry jam, blueberry jam.
****For the coconut milk powder, if using, be careful that the brand you purchase is actually dairy-free because some can contain dairy in addition to coconut. I linked in the ingredients list a brand that’s vegan so you can see an example of what to look for.
*****Storage notes: I found that the longer the cake was stored in the fridge the drier and crumblier the filling got. After 2 days the raspberry jam got largely absorbed into the crepes and the flavor became less prominent. The cake is still delicious at this stage (for how can crepes, coconut milk, and raspberry jam not be delicious, right?), but it lost a lot of its original luster, lushness and some of its flavor. So I recommend making it the day of and keeping it at room temp until serving.


altamama says
Well I'm dying to try it but haven't yet - just wanted to say congratulations!!! for making the cover of Thrive! you deserve it!
Audrey says
Thanks very much! :) I appreciate it.