I love all things chocolate orange. If you do too, then this tart is definitely for you.

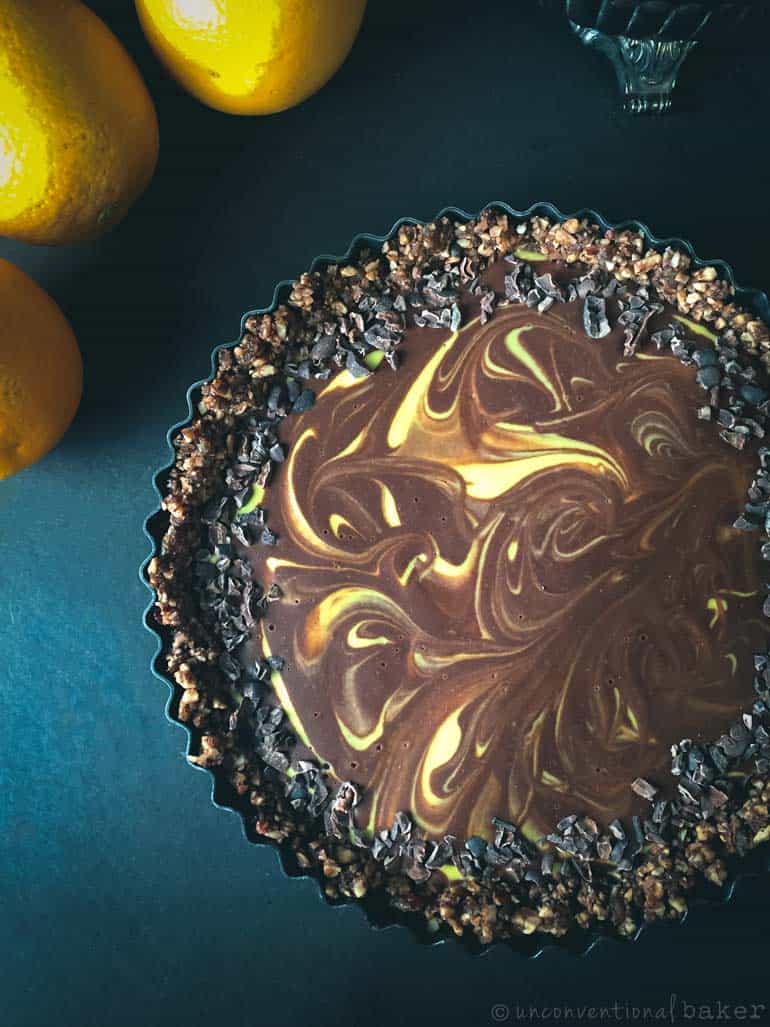
This delicious chocolate orange tart is just right in so many ways... lush, creamy, velvety smooth, rich, chocolatey, and so immensely flavorful.

With swirly layers that hint of lovely orange notes, a hefty dose of rich and deep chocolate, and a hazelnutty crust that complements the chocolate orange flavors so well -- this one is sure to impress. The crunchy cacao nibs topping are the "cherry on top", for good measure :)

If you're into the orange and chocolate flavor pairing, you might also like these treats from the blog archive as well:

Before you dive in to this chocolate orange tart... here are a few recipe notes and substitution tips:
- Be sure to read the nut soaking instructions in the recipe notes for the cashews... And also please make sure all ingredients are at room temperature before getting started (otherwise you'll run into trouble!).
- The orange extract is optional. I already had it on hand and felt it amplified the orange flavor nicely here, however you can also make this without it (in that case I'd use a lot more orange zest). It might not be as "orangey" in that case, but it will still be delicious.
- Cacao butter is made from cocoa bean. I used it here in place of coconut oil (which is typically used to thicken and solidify raw treats), and it gives the tart a much richer and deeper chocolate flavor. If you can't find it, you can use unscented coconut oil as a close substitute.
- If you're intimidated by making swirls, you can just make this a 2 layer tart instead. But swirls are super easy and messy swirls are totally acceptable -- I hope you give them a try :)
- You can use other nuts in place of hazelnuts for the crust if you prefer. Almonds, walnuts, or pecans would work great.
- Cacao nibs topping is totally optional, but adds a nice crunchy chocolatey effect and provides a bit of a bitter-sweet contrast in the tart's flavors.
- If you prefer to make it without dates in the crust, just increase the amount of maple syrup and cacao butter a little.
- You can use regular cocoa powder instead of raw cacao powder if you prefer, but I think the raw cacao powder gave this a better flavor.
- If you don't have a 7" tart pan, you can make this in a 6" springform pan instead. Also, just a quick note that my tart pan has taller edges. Some of the ones I've been seeing for sale the last few years have much shorter edges, so they might fit a bit less in them as a result -- if you're fining that's the case, simply put some of the extra contents in freezer-safe ramekins and enjoy as a mini treat on the side. And lastly, if you need to size the recipe up or down, see the downloadable cake multiplication guide at the bottom of this page.
- Note that if you have a newer wide pitcher power blender you might need to double the recipe to get enough contents to blend things through properly (I use an older tall profile Vitamix and it works great for this recipe).

Chocolate Orange Tart
A deliciously lush and flavorful no-bake chocolate orange tart. Raw vegan, gluten-free, grain-free, refined sugar-free.
- Prep Time: 20 minutes
- Total Time: 20 minutes
- Yield: 7" tart
- Category: Pies & Tarts
- Method: Raw, No-Bake
- Cuisine: Dessert, Vegan, Raw
- Diet: Vegan
Ingredients
*Make sure all ingredients are at room temperature before getting started
Crust
- 1 ¼ cup hazelnuts
- 6 soft medjool dates, pitted
- 1 tbsp raw cacao powder
- 1 tbsp maple syrup
- 1 tbsp melted cacao butter
Orange Filling Layer
- ¾ cup raw cashews, pre-soaked and strained*
- zest of ½ an orange
- 4 tbsp orange juice, room temp
- 3 tbsp maple syrup
- 3 tbsp melted cacao butter
- 1 tsp pure orange extract
- ½ tsp salt
- 1/16 tsp turmeric powder
Chocolate Filling Layer
- ⅓ of the orange filling layer
- 3 tbsp raw cacao powder
- 1 tbsp maple syrup
- 1 tbsp orange juice
- 1 tbsp melted cacao butter
Topping
- a few handfuls cacao nibs
Instructions
1. Process the hazelnuts into a very fine crumble in a food processor. Add all remaining crust ingredients and process to combine. Transfer this mixture into a 7" tart pan with a removable bottom, and press down into a thin even crust all along the base and edges. Set aside.
2. Blend all orange layer filling ingredients in a power blender until completely smooth. Remove ⅔ of this mixture out of the blender and set aside.
3. Add all chocolate layer filling ingredients to the remaining mixture in the blender, and blend until smooth.
4. Pour or spoon in a bit of the chocolate mixture into the center of the crust in the pan, then pour / spoon in some of the orange mixture into the center of the chocolate mixture. Repeat the process, alternating between the two mixtures until you use them both up. Tap the pan on the counter lightly to smooth out the mixture. You can use a skewer to swirl the two layers together lightly. Sprinkle with cacao nibs around the edges.
5. Freeze the pan for 5-6 hours or overnight, then thaw out very slightly, slice and enjoy! Keep leftovers frozen.**
Notes
*To pre-soak nuts: place in a glass bowl, cover with water, and leave to soak for 4 hours (or overnight in the fridge). Then strain and discard the water. For a quick pre-soak, cover with boiled water and soak for 15 mins, then strain and discard water. (Note: this technique doesn’t preserve the nutrition of the recipe as well as the traditional soaking technique above). Additional Note: the purpose of soaking the nuts is to re-hydrate them and plump them up for blending into a smooth, cheesecake-like consistency. Proper soaking techniques also maximize nutrition and digestibility. If you’re interested in learning more about nut soaking and other dessert prep tips and tricks, I delve into these subjects in detail in my book Unconventional Treats.
**Storage notes: treat this tart like an ice cream dessert. Keep it frozen at all times until ready to eat, and freeze any leftovers. If left too long at room temperature it will begin to melt back into the consistency it was in the blender.


Natalia says
Could I use coconut cream instead of cashews for the filling?
Audrey says
Hi Natalia. I don't think this will work in this recipe as the cashews provide a lot of the firmness and flavor here.
I know it's not the same dessert, but in the even this helps, I do have this amazing coconut cream pie recipe that might work for you instead: https://www.unconventionalbaker.com/oil-free-vegan-coconut-cream-pie/
Kay in Dallas says
This was delicious, but not enough filling to generously fill the crust. I had to increase the amounts by 25%.
Audrey says
Hi Kay. So happy you enjoyed this tart!
I'm so curious about why the filling was lower for you. Wonder if your tart pans has taller walls (is it a 7" one?).
Elen says
I just did this receipt. I tired the fillings and they taste amazing.
The only problem I encountered was that both fillings were too thick. Should I leave part of the water from the soakes cashew?
Audrey says
Hi Elen. Hmmmm... thinking. No, no need to use the water the cashews soaked in.
2 Q's for you:
1. Were all the filling ingredients at room temp? (Anything cold could make the filling harden up and not blend through as smoothly / thinly.
2. What kind of blender did you use? (A power blender (like Vitamix) usually works best here).
3. Was anything substituted?
This can help me narrow down why the filling might have ended up thicker.
Karo says
hi! im a bit confused about the layering ! do you think i could just pour the orange first and then chocolate ?
i dont understand honestly how you made it 🙈 and from what i see its mostly chocolate yet the 2/3 our of whole filling was orange without cacao , what am i missing ? 🤭
Audrey says
Hi Karo, yes you can definitely just do two separate layers if you prefer :)
In case it's helpful, I have another cake recipe where I use the same technique and have a video for it, so you can check it out to see what I mean in step 4 here: https://www.unconventionalbaker.com/oil-free-vegan-coconut-lime-cheesecake/
Taylor says
Hi there! Would this quantity convert well to a 6" springform pan? More in the style of a cheesecake? Thank you! Love your recipes. :)
Audrey says
Hi Taylor, I think that would work well overall in a 6" pan. Only thing is the crust might be a bit thick, so you might want to reduce it to 1 cup of nuts and a tiny bit less of everything else as well in proportion. Enjoy! :)
Monisha says
Our neighbor brought us some of this tart to treat us and it was so good! Our whole family enjoyed it and we're not even vegan.
Audrey says
Oh wow, nice neighbor!! :D So glad you enjoyed it, and thanks so much for taking the time to leave your lovely feedback.
Christie says
Made this for my daughters birthday. Doubled to fit my spring from pan, used the orange extract, used cacoa butter. Added enjoy life mini chocolate chips to the nibs on top. Everyone really loved it!
Audrey says
Aw, so happy you all enjoyed it. Thanks for the lovely feedback!! :)